Al's Robotics....
| Site
Index |
| Site Index |
| Rambo Auto Tools |
| Robotics Events |
| Linux Computing |
| Reading Books |
| Latest
News |
new information added to the Robux Project Pages click here for more info |
Basic R/C Robot
This tutorial will hopefully guide you through the processes of making a simple radio controlled robot Similar in control to "Psycho Mantis". The main items that you will need to make this basic project are as follows:
- A basic radio control set with a suggested six channels although a two channel will do to get started with.
- Two speed controllers with forward and reverse functions on.
- Two DC motors with gear boxes on.
- One basic home brood chassis
- And a hand full
of nuts, bolts and wire
Radio gear
I suggest getting a six channel because you will come to need more and more channels as your expertise and projects grow. Although you will be able to use a two channel to control this project it will leave you with no spear outputs. As logic suggests two speed controllers will take up two receiver outputs so this would leave you with no channels for weapons of mass destruction if you had a two cannel radio control set.
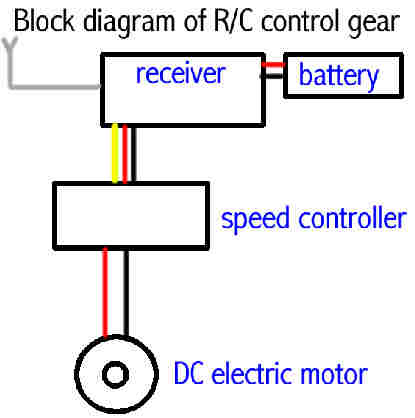
This set up is for one speed controller and one motor

This set up is for two speed controllers and two motors
Speed controllers
The speed controllers will need to be considered carefully before you start to build or buy them. The motors you use will determine the size and power of the speed controllers you will use. If you are unsure as to what speed controllers to get you should ask the suppliers of speed controller they should be able to give you all the information on what they can and can not do. Its always best to fuse your speed controllers to prevent any damage to the electronics of the speed controller. On "Psycho Mantis" I have 15 Amp speed controllers that have been fused at 5 Amps which have no problems handling the windscreen wiper motors at all, but as you can see I left a bit of room within the fusing of the motors and current rating of the speed controllers so I could play around.
Mixer or not
The idea of a mixer is to take your two signals from the receiver for the two speed controllers and convert it so that it gives you steering like a car. As you would normally have two sticks both going forwards and backwards on your transmitter to control your robot, but with a mixer you control your robot like a RC car, so you have one stick going up and down for speed and the other from left to right for turning. Although you don't need to have a mixer on you robot it does make steering a lot easier. If you like the idea of a mixer have a look at the A.R.M. Robot Mixer that I sell on this site. A mixer is only need if your robot is using two motors in a tank style steering method.
DC motors
The motors should be arranged side by side and then the steering will be achieved by a method of skid steer which stops one motor while the other turns and that will turn the robot around. If you encounter interference with your radio gear when your motors turn it means that the motors you have do not have capacitors on. To add capacitors to your motors you should see my circuits page where it will tell you how to put the capacitors on your motors to stop / reduce the interference you are getting.
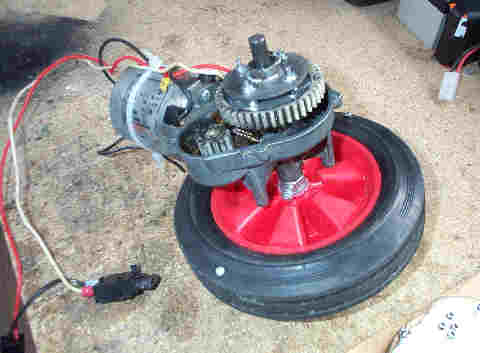
Windscreen wiper motor
The output shafts were increased on the windscreen wiper motors so I could fit the wheels on and get a tight lock up on the wheels to prevent slipping.
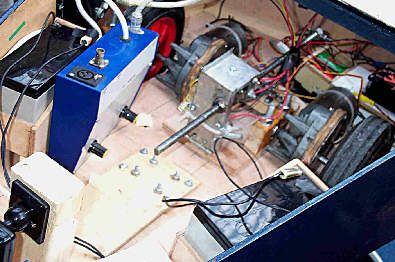
Here you can see the motors side by side arranged for the skid steer method of steering.
More about motors (where from, what type):
I never tend to like making gear boxes as they require a bit of time / work to get them running smoothly. So what I find best is to look for motors that already have a gear box on some examples of this are wind screen wiper motors from cars and cordless drills available in DIY shops. Wiper motors can be tricky to use as you normally get either two right handed motors or two left handed motors although it is possible to get mirrored motors. Taking Psycho Mantis as an example, I had two right handed wiper motors. So what I had to do was modify one of the wiper motors so that the drive shaft came out the other side instead, making a right hand wiper motor modified to left hand. In relativity I modified both the wiper motors because I wanted to have longer output shafts on them, so changing one to a left handed wiper didn't take me that much longer. Of course an easy way around making any changes to the mechanics of the wiper motor are to just turn one of your motors around the other way. Two hints in choosing your wiper motors I would say is to get Bocsh ones, these are found in most Fords (i.e. Escorts, Fiestas etc.) And from a scrap yard should cost you from £5 to £20 max. The second thing is, don't bother with rear wind screen wiper motors these are a bit small and the output shafts on most of them move back and forth never doing a full rotation. Most wiper motors consume a max of 8 Amps on normal supply Voltage, but if you find they go to slow you can try increasing the Voltage from the average 12 Volts to 24 Volts although this will decrease the life of the motor (not by much). Also note that wiper motors have grounded cases (i.e. Connect to V-). So if you plan on a metal chassis you need to take them apart and find the brush that has a wire going to the case of the wiper motor and cut it and solder an insulated wire onto it and bring it out of the case, so you can still supply power to the motor.
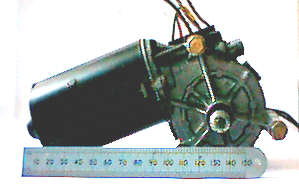
Above, Bocsh wind screen wiper motor. It's about 170 mm long.
Drill motors are also a good cheap option, for as little as £10 you get motor, gear box and a pack of rechargeable batteries. A couple of things I would say about these are to keep the motors/ gearboxes in the drill case (cutting of what you don't need) and to use U bolts to fix them to your chassis, as if you take them out of there cases they can be very tricky to mount. The current these motors can consume varies a lot but you can expect to need at least 20 Amp speed controllers for one of them.
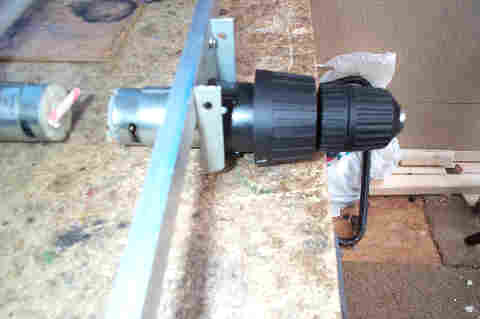
Above, 9.6 Volt drill motors from Driller Killer that are powered at 12 Volts with a Sealed lead acid battery.
Chassis
The shape and size of your chassis is totally up to you. I think the best shape for indoor use would be a circle, as its easy to maneuver in your house as it will turn on the spot. You should put a couple of casters on your chassis to help steady it .
Batteries
The most commonly used batteries for big robots are sealed lead acid batteries, these will provide your robot with loads of power. The batteries I used on "Psycho Mantis" are 6 Amps and these will power it for about an hour which should be more then enough time for most of us robot builders. Of course if your using drill motors you might just as well use the batteries that come with the drills. Although you wont get as long a run time then if you were using lead acid batteries this is because rechargeable batteries tend to have lower current capacities then lead acid batteries although you can get some that have a higher current capacity but these come a at a high cost.
Stick
it together
When you get all the main parts don't worry about the shell of the robot
because it just doesn't matter on your first robot all that matters is
that you get it to move under your control. Just put it all together on
your chassis and double check all your work especially the electronics
and power supply. There is very little that can go wrong with radio control
gear if you have brought it from the shop so don't be frightened to turn
it on, and if you have mad a mistake you wont have been the first to do
so. If you get stuck then help is just around the corner in the form of
the many web groups that are on Yahoo, you can check mine out at: http://uk.groups.yahoo.com/group/alsrobotics
Web pages built and © by A R Martin E-mail at:
Home-page Robots Tutorials Links E-mail Circuits Events BEAM PIC Microchip Robotics Shop Computers FMM-RobotWars Sponsors Suggested reading Ebay Listings Serial Speed Controllers MicroMouse Walkers Driller-Killer Laptops Excaliber Robot Retox Drill Robot Robot motors Robot Builder Google Robux Project gorobotics Robot Cafe Robotics Solar Navigator PIC Axe Tech Supplies MUTR GSM Control Home Automation RC tracker Qtronics Design - Electronics & Firmware Design Artist R C Martin http://www.speedace.info/qtronics.htm http://www.solarnavigator.net/qtronics.htm http://www.elecdir.com/site/store/23197/index.html http://www.robotbuilder.co.uk/forum/topic.asp?whichpage=2&TOPIC_ID=861ᶱ