Al's Robotics....
| Site
Index |
| Site Index |
| Rambo Auto Tools |
| Robotics Events |
| Linux Computing |
| Reading Books |
| Latest
News |
new information added to the Robux Project Pages click here for more info |
SSCH_1 Serial Speed controller
15 Amp 12 Volt
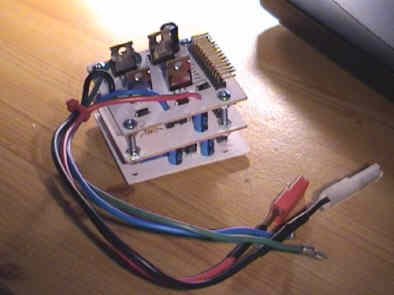
The SSCH_1 is one of the more advanced speed controllers in the ARM range of products and as normal is packed full of features to help improve your robot. The SSCH_1 achieves a current handling of up to 24 Amps continuously, this is from the use of four 24 Amp MOSFETs in an H-Bridge form. Combined with the power output stage of this speed controller is the use of a MCU (mini computer) that controls the speed of your motor through the use of high frequency PWM, this provides a very smooth and fine motor control. Being a serial speed controller it's possible to control the SSCH_1 from a multitude of devices such as your PC, Basic Stamp 1 and 2, PIC and loads more. The SSCH_1 could even be combined with a serial Modem so you can link your robot to your PC with out the need for wires There is also a Windows PC program that is freely available to control the SSCH_1 speed controller that can be downloaded from this web site(see further down the page for details). The SSCH_1 speed controller can operate on voltages from 10 to 14 volts. It's best combined with a 12 Volt lead acid battery for optimum performance.
The SSCH_1 speed controller is supplied ready made and ready to go from the moment you've hooked the battery and motor up.
Please note that it is highly recommended that you put a fuse in line with the positive power supply (+) to the SSCH_1 speed controller to avoid damage to either the SSCH_1 or your motors or even both.
Spec:
- Serial control
- Up to 15 Amp normal load (using 24 Amp MOSFETs)
- High frequency PWM motor drive
- Easy to use
- Can be stacked, more then one can be put on a serial port
- Compact size at only 50x60x60
- Designed for connection straight to a 12 Volt power source (Sealed lead acid batteries!)
|
Price: These items are now obsolete, we have a new design, which will be in full production soon. |
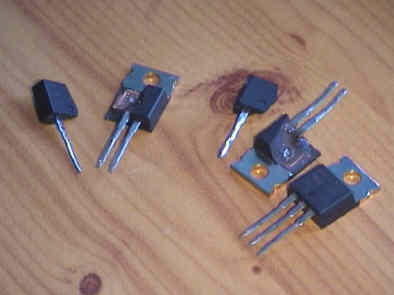
The SSCH_1 speed controller design has been tested to destruction, above are photos of the MOSFETs after having 0.1 Ohm load put on them drawing around 120 Amps, no surprise that they didn't last long as there only rated at 24 Amp. Made a bit of a bang.
The SSCH_1 PC control software
This software has been designed to allow easy control of your SSCH_1 speed controller from a Windows PC. This software is provided free and as such comes with no warranties what so ever. It is also possible to program new Controller numbers from this software. When you buy a new SSCH_1 speed controller you will also be sent this software with speed controller on a CD-ROM.
SSCH_1 data sheet for manual programming and use
| Program
code (decimal) |
Operation |
24 |
Sets
2400 Baud |
48 |
Sets
4800 Baud |
96 |
Set
9600 Baud |
240 |
Baud
Rate Reprogram |
| 250 |
Controller
Number Program |
| 251 |
STOP |
| 252 |
Not
used as yet |
| 253 |
Motor
Forward Select |
| 254 |
Motor
Backward Select |
| 255 |
Not
used as yet |
| 0-90 |
Variable
speed set |
Read Controller number
Code
249 instructs the SSCH_1 to serially send it's Controller number,
this is done for easy identification of SSCH_1 units if you forget
there Controller number
To program the Controller (speed controller number) simply send the decimal number 250 to the SSCH_1 speed controller from any PC serial port using a terminal program. After sending this number you will be asked to assign a new Controller number to the SSCH_1 speed controller you should then send a decimal number from 200 to 220. This number is what determines which speed controller the instructions are meant for i.e. 200, 201 or 202 and so on. A maximum of 20 (Controller numbers from 200 to 220) SSCH_1 speed controllers can be connected to one RS232 serial port.
Please note that the default Controller number is 200, if you have just brought a new speed controller from Al's Robotics then this is the Controller number that has been set for the speed controller.
STOP:
Sending the decimal number 251 will stop ALL speed controllers that are connected to the serial port the instruction was directed too to stop all power output to your motors. Thus acting as an emergency stop for your motors.
Not used as yet:
These are commands that have been allocated for future use, but as yet are not in use and sending these commands to a SSCH_1 speed controller will do nothing.
Motor forward select:
Decimal command 253 sets the SSCH_1 speed controller for Forward motion (i.e. Your motor will go forwards)
Motor backward select:
Decimal command 254 sets the SSCH_1 speed controller for Backward motion (i.e. Your motor will go backwards)
Variable speed set:
These decimal numbers from 0 to 90 sets the speed at which your motor will turn. If you send 0 your motor will not turn but if you send 90 your motor will turn as fast as it can in your chosen direction. And all numbers between these values will give you either a higher or lower speed.
Command sequence and examples:
The order in which these commands are sent to the SSCH_1 speed controller is vital for proper operation. Below is the order in which you must send the codes from your RS232 serial source:
- Controller number
- Direction select
- Variable speed set
Below is an example for a motor going forwards at half speed (45) and a speed controller with the Controller number of 201
Serial send the decimal value "201"
Serial send the decimal value "253"
Serial send the decimal value "45"
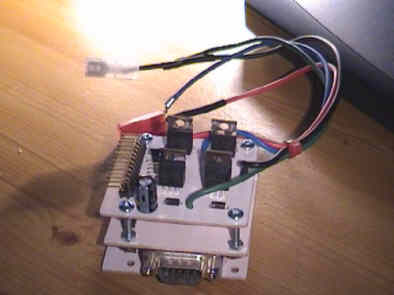
Wire connections
| Wire
Colour |
Connect
to. |
| Red |
Positive
supply, +12 Volts |
| Black |
Negative
supply. -. ground, 0 Volts |
| Green |
Motor
connection 1 |
| Blue |
Motor
connection 2 |
Speed controller serial settings:
The SSCR_1 speed controller comes set by default to the following settings:
- 9600 Baud Rate (can be reprogrammed)
- 8 Data Bits
- Parity None
- 1 Stop Bit
- No Flow Control
The Baud Rate at which the SSCR_1 speed controller communicates
may be changed to one of three settings, 2400 Baud, 4800 Baud and
9600 Baud.
Setting the Baud is a very simple task and is very fail safe. Simply
send the decimal number 240, this sets the SSCR_1 speed controller
into reprogram mode, you can then send the following decimal number
to set the Baud Rate: 24 for 2400 Baud, 48 for 4800 Baud and 96
for 9600 Baud.
It is important that once the SSCR_1 is set into Baud reprogram
mode that you only send one of the above numbers, otherwise you
will not be able to communicate with SSCR_1. If at boot time the
SSCR_1 detects that an invalid Baud rate setting has been programmed
into it, it will default back to 9600.
After you have finished reprogramming Baud Rate setting you must restart the SSCR_1 speed controller by removing all power to the board. At the next boot time your new Baud Rate will be implemented.
Example of reprogramming the Baud to 4800:
Serial
send the decimal number “240” this sets Baud reprogram
mode
Serial send the decimal number “48” this sets the new
Baud speed
You will then receive a confirmation from the SSCR_1 that is decimal
“255”
Restart
the SSCR_1 by removing all power, reconnect power after a few seconds
and your new Baud Rate settings will be implemented.
For further information and how to order please send an e-mail to: sales@alsrobotics.co.uk
Web pages built and © by A R Martin E-mail at:
Home-page Robots Tutorials Links E-mail Circuits Events BEAM PIC Microchip Robotics Shop Computers FMM-RobotWars Sponsors Suggested reading Ebay Listings Serial Speed Controllers MicroMouse Walkers Driller-Killer Laptops Excaliber Robot Retox Drill Robot Robot motors Robot Builder Google Robux Project gorobotics Robot Cafe Robotics Solar Navigator PIC Axe Tech Supplies MUTR GSM Control Home Automation RC tracker Qtronics Design - Electronics & Firmware Design Artist R C Martin http://www.speedace.info/qtronics.htm http://www.solarnavigator.net/qtronics.htm http://www.elecdir.com/site/store/23197/index.html http://www.robotbuilder.co.uk/forum/topic.asp?whichpage=2&TOPIC_ID=861ᶱ